Average Reviews:

(More customer reviews)First of all the SETUP is very easy. The on screen prompts will take you though the steps.
1.Install the software.
2.Plug the master network adapter into the power outlet and plug the Ethernet cable into your router
3.Plug the camera into power outlet and click yes to update firmware (adapters and camera).
NOTE: Do not unplug the camera or the master adapter during the update.
Wow that was easy. It took less than 15 minutes to get the system up and running.
PICTURE QUALITY
The picture quality is great during daylight hours but not so great at capturing clear pictures of moving objects in total darkness. However in my case I have a flood light with motion detector that comes on when someone enters the area at night making the video bright and clear.
MOTION DETECTION
What I like is that you can draw areas on the actual image from the video camera to trigger recording. In other words you can eliminate false recordings from cars going by or movement outside your property.
You set up each camera individually providing ultimate flexibility in alerts, sensitivity and recording. In addition, once you have created a LogitechAlert account, you can select which cameras triggers an email alert.
EMAIL ALERTS
You set the LogitechAlert account up from the Settings Menu (the gearwheel icon).
From here you can enter several email addresses. I have mine set to send a text to my cell phone (as I don't have a smart phone with email and web access).
Most cell phone providers offers an email address starting with your cell phone number that will be forwarded to you as a text message.
Please look the email address up on your providers web page. I can not put them up due to Amazon posting regulations.
You may get charged for each text by your cell phone provider so make sure to set the Alert Frequency and Motion Filter conservatively (from within the Settings Menu - Alerts-Advanced).
As mentioned above, I have not received one false alarm although my system is still set using the default values.
RECORDING WITH PC TURNED OFF - THIS IS A GREAT FEATURE.
The camera(s) stores all motion triggered activity regardless if you have the PC on or off. To review all recorded activity, start the PC and click the "Enter Playback Mode" icon. A very intuitive calendar and timeline shows up indicating recordings. Point to a time and click on play to see the activity.
UPDATE:
You can review/playback history from only the dedicated PC on your network.
Logitech suggests not loading the software on more than on PC on the network.
If you do, you can only watch live video but review/playback will not work from the other PC's (also unexpected results may occur).
NOTE: You can view the real time images from anywhere on the web with the free Logitech Web Alert Viewer. To get full control with playback via a remote PC you must purchase the Logitech Web and Mobile Commander for an annual fee* of $80 (at the time of this writing).
Unless...
You keep a PC turned on all the time and control it from any PC (or web enabled phone) on the web using Teamviewer or LogMeIn (both are free for private use - you can download the programs from Cnet.com). Then you can access the Logitech Alert Commander interface as you normally do from home.
UPDATE 1: I am using the free version of LogMeIn and it works great. The only disadvantage is that you can not hear audio from the home computer. But you can see the live video feed and use playback along with camera adjustments etc. Actually you can operate your home computer just as if you were sitting in front of it. You can access it from work or anywhere in the world via the internet.
UPDATE 2: I have now used both remote programs for over a month. Logmein appear to be unreliable with respect to video quality. TEAMVIEWER IS THE WINNER (To get perfect video quality: select "View", "Optimize Quality" from the TeamViewer screen on the remote computer).
Cost for leaving your home computer on all the time.
The cost for a 40 Watts consumer** 24 hours per day, 365 days per year = $35/year at $0.10 per kWh.
However, LogMeIn allows you to use "Wake Up On LAN" so you can turn your home computer on from the remote computer (Too much to cover here).
* Come on Logitech!!! Reduce it to a $50 one time fee and sell more systems to happier customers.
** One UPS manufacturer estimates 40 watts power consumption from an entry level desk top with a 20 LCD monitor. Turn the monitor off and bring the cost down even more. Also set the hard drive to turn off if not in use via Windows "Power Options Interface". You may also be able to set the home computer to "Wake up on LAN".
INSTALLATION OF THE CAMERA'S POWER/DATA ADAPTER IN THE ATTIC
First of all I wanted to hide the wire to the camera.
Logitech's instructions show the power/data wire going from the camera to a power outlet on the side of the house.
Consequently a thief can easily unplug the camera.
Solution
Pull an extension cord from a power outlet in the attic (or somewhere else) and connect it to the grey power supply/adapter for the camera.
IT WORKS!!!
I know Logitech Customer Service had told another reviewer "The adapters CANNOT be installed in the attic".
Logitech may be concerned about high attic temperatures present in some climates.
My attic does not get very hot; in addition I mounted the adapter just above the lower perimeter soffit vent where outside air constantly flows in.
The power/data Ethernet cable to the exterior camera (mounted under the roof overhang) is now routed through the soffit to the camera adapter in the attic.
Drill a 9/16" (14 mm) hole to allow the Ethernet plug to pass through the soffit. Mount the power adapter over the soffit vent with the power cable coming out at the top as shown in Logitech's instructions.
NOTE: I used a 100 foot grounded heavy duty extension cord plugged into a grounded power outlet. I don't know if using a grounded outlet and grounded extension cord matters because none of the adapters are equipped with grounded plugs. You may not need a heavy duty cord as the camera adapter uses very little power.
PREVENT BLACKOUT DURING POWER OUTAGES USING A UPS (Uninterruptible Power Supply)
I still want the surveillance system to work during power outages or if the power line to the house is cut.
The Manual tell you it will not work if you use a surge protector or UPS.
Solution
I already have the cable modem and the wireless router plugged into an APC BN600R Battery Backup (UPS), so all I had to do was to plug the black Logitech network adapter into the UPS and pull an extension cord from the UPS to the grey Logitech camera adapter. All the equipment is fed from a single UPS.
IT WORKS!!!
The disadvantage is that you have to pull extension cord(s) from the UPS to the camera adapters. In my case it was not a problem because the extension cord would drop down from the attic between the studs in one of the walls to where I have my router.
I am sure you can use a higher capacity UPS as long as ALL your Logitech adapters are connected to it.
SOUND/AUDIO
Out of the box there was no audio from the camera.
Solution
To turn the sound on:
1) Un-mute from the Command screen (slider at the right hand bottom) and
2) Click on Settings (gearwheel icon) and click on the camera name (your camera(s) will be listed by the name you give them during setup "Entry way", "Hall way" etc.)
Then check the box Enable Audio (after accepting the legal notice).
Note: If you have more than one camera, you have to Enable Audio for each one.
GOOD QUALITY PRICE RATIO
Overall I will rate the Logitech 750e a quality system for the money. As an alternative, you can purchase professional systems that will cost thousands of $ but is unlikely that they have the remote access this system has.
Perhaps Logitech have "beefed up" the mounting hardware for the camera. My hardware is rigid and of good quality. Another reviewer had problems with the hardware.
(I tightened and pre-adjusted the holder/adapter and added a drop of Locktite (blue) to the threads prior to installation. It is easier done on the ground as compared to the top of a 15 foot ladder).
UPDATE: The mounting plate is covered with a rubber cover. You have to tighten the holder rod FIRMLY to the base to ensure a rigid mount (or else the camera will wiggle).
Also, one of the cameras would turn freely no matter how hard the thumbscrew was tightened. It turned out that there is a phillips screw hiden inside the short rod which is being clamped by the thumbscrew assembly. The phillips screw was loose. Simply remove the thumbscrew completely to take the assembly apart. Then tighten the phillips screw and put it back together.
Logitech, QA/QC you need to address this issue. This is probably why so many people are complaining about the camera mount.
SUMMARY
-Very easy setup
-Great picture quality in daylight but not in total darkness
-Motion detection is very reliable
-Flexible email alert settings
-Workaround if you don't have a phone with email or web access
-Recording with PC turned off - great feature
-Workaround to avoid paying $80 per year for remote access
-Attic installation of the camera's power adapter
-How to connect "Battery UPS backup"
-How to turn the sound feature on
If you find this review helpful to you please vote by clicking on the YES button below.
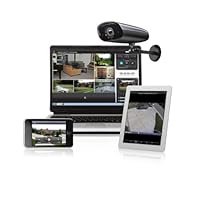
Click Here to see more reviews about: Logitech Alert 750e Outdoor Master Security System with Night Vision
Logitech alert 750e outdoor master system is the weatherproof, night vision video security system you can set up yourself and count on when you need it. installation is simple and takes just minutes.

No comments:
Post a Comment